Hey Peter. Yes, I wrote a whole blog post instead of sending you a Word doc. This is literally the documentation I was going to write for you, just published. Everything in here applies directly to your recruitment site. Everyone else reading: welcome, this is exactly how I work.
I Discovered This Stack at Work, Not for Websites
I want to be upfront about something: I did not set out to build a website when I first started using this stack. I came at it from a completely different direction.
At work, I needed a better way to host internal application front-ends. Power Apps had been the default, but I was increasingly frustrated with it. The limitations on layout control, the dependency on the Microsoft ecosystem for every small thing, the way it fights you when you want to do something that should be simple. I wrote about that in more detail in my post on why full-stack development is making a comeback. The short version: Power Apps is a bit crap for anything that needs to feel like a proper application.
Azure Static Web Apps solved the problem. It gave me a place to host a proper front-end with custom authentication handled natively, no login system to build from scratch, and clean integration to Azure Functions in the backend. I started using it for internal tools at Ritchies and liked it a lot. I am a Microsoft-stack person by nature, so Azure is where I naturally gravitate. Other cloud providers absolutely have their equivalents, but I know Azure well and that knowledge is worth more than hunting for something theoretically optimal.
Then one day I looked at the free tier properly and had a fairly obvious realisation: the same infrastructure that hosts an internal application also works for a public website. The free tier does not require authentication at all. You can host anything publicly. So the question shifted from "how do I host internal tools cheaply" to "wait, can I just use this for my personal website for free?"
The answer was yes. So I built kepakisan.co.nz.
That led to a second realisation. The gap that had always slowed me down on personal projects was the front-end. I am a data and analytics person. Backend, APIs, databases, pipelines: comfortable. CSS layout, making something look like a designer touched it: slow. Tools like Magicpatterns and Lovable changed that. AI design tools now get me to 90% of a working UI without me spending a week fighting with layout.
So: SWA for free hosting. AI tools for the front-end. GitHub for version control. Cloudflare for DNS. Kiro for ongoing changes. The stack assembled itself piece by piece from actual problems I was solving, not from reading a "best free hosting" roundup.
After living with it for a while, I started mentioning it to people. One of them was Peter, who is starting a recruitment business and needed a site. He had the vision for the brand. I had the stack. We are building it together. And because I needed to document the process for him anyway, I thought: might as well just write a proper blog post.
Five Steps, Full Ownership, Zero Hosting Cost
Here is the exact process in order. Each step builds on the last. This is written to be followable by someone who has not done this before, because that is exactly who it is for.
This post includes screenshots and GIFs throughout. They are tucked away to keep the reading clean. Whenever you see a bar like this, click it to expand the visual. Click again to collapse.
Design: Magicpatterns or Lovable
This is the step I genuinely step back from, because you know your brand better than I do. You know your clients, your tone, what you want someone to feel when they land on the site. No developer can extract that from a written brief as accurately as you can extract it from seeing something on screen and reacting to it.
Magicpatterns and Lovable are AI-powered design tools. You type what you want, they generate a working UI. You look at it, adjust your description, generate again. It is iterative and surprisingly quick. You might go back and forth many times. That is the process. The goal is to arrive at something that genuinely feels like you, not something you settled for.
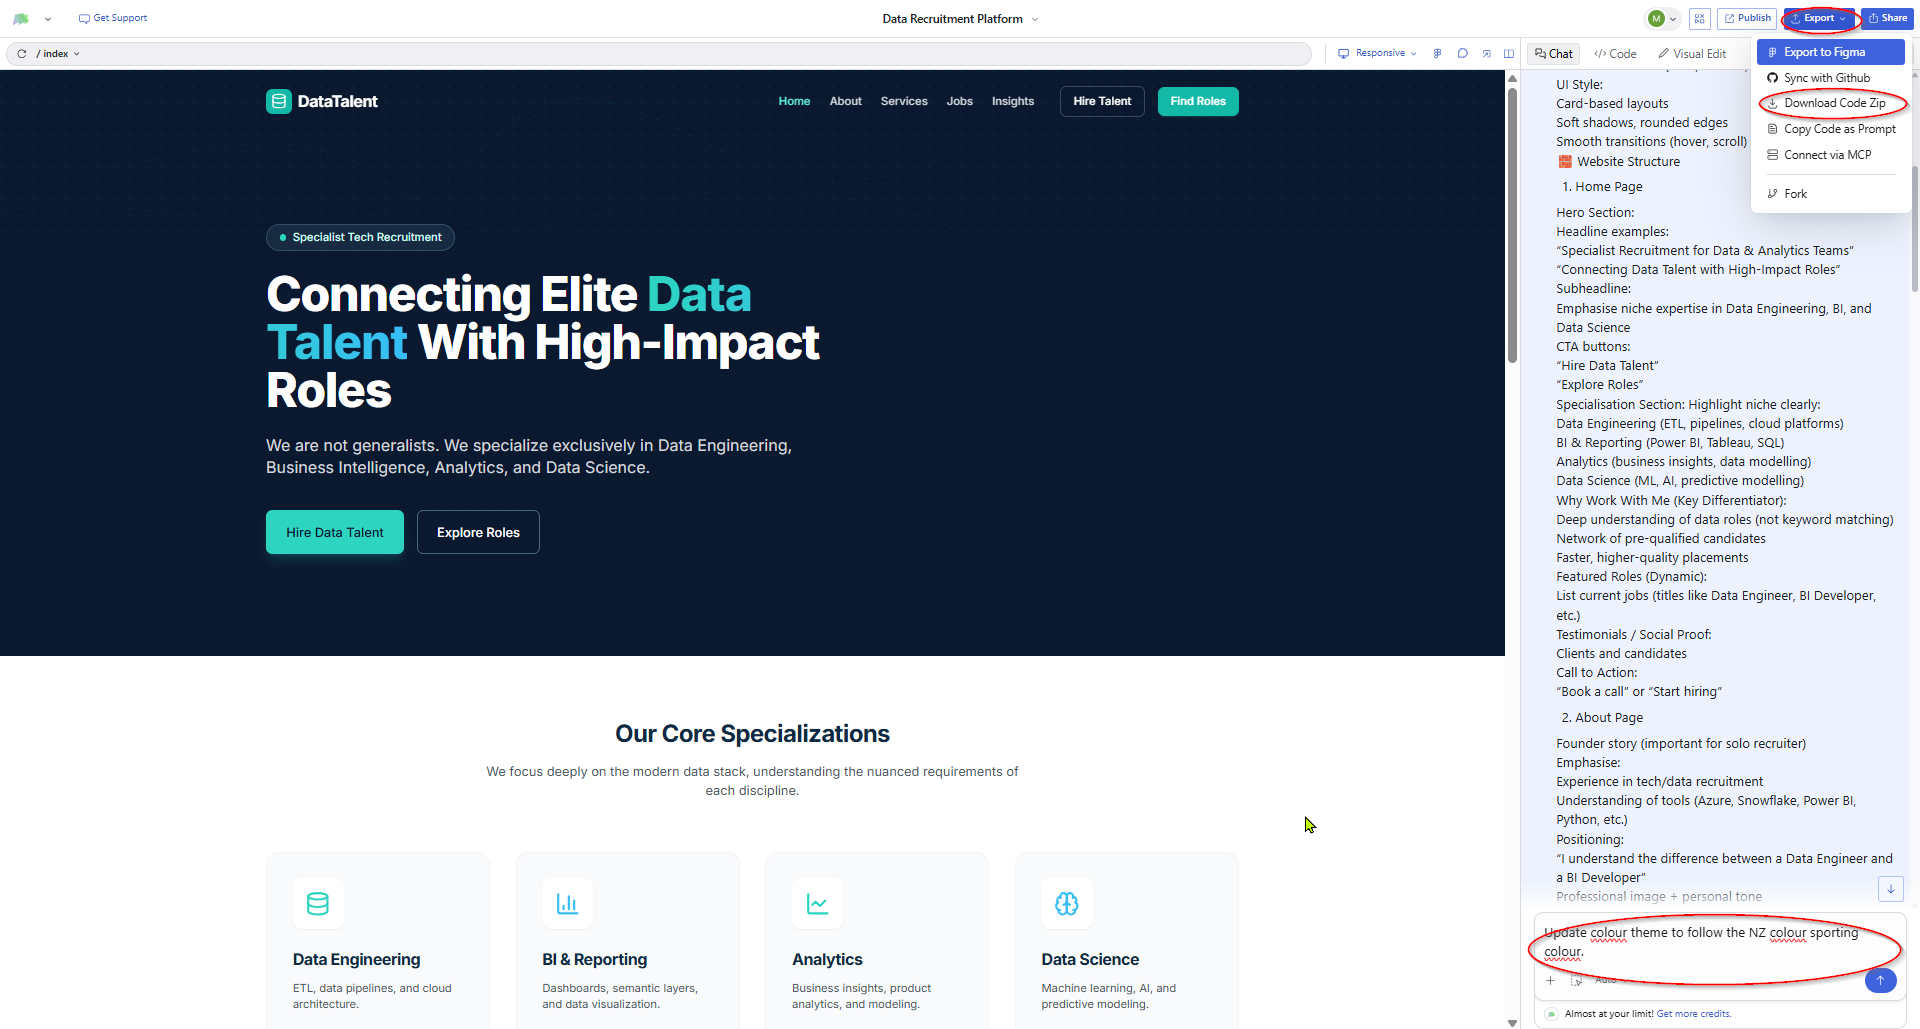
The important thing to understand about both tools: they are not just giving you a visual preview. They are giving you the actual code. When you are happy with the result, you export it. That code is exactly what gets deployed to the live site. Nothing is lost in translation between "it looks good in the tool" and "it looks good online" because what you see in the tool is already the real thing.
MagicPattern in action: the generated site preview on the left, the chat and structure panel on the right, and the Export menu open. "Download Code Zip" is the one you want. That zip is your codebase.
Version Control: GitHub
The code from step 1 needs a permanent home. That home is GitHub. Think of it as Google Drive specifically for code: every version of every file is saved, you can roll back to any previous state, and it connects to deployment tools automatically.
Creating a repository
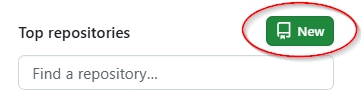
Go to github.com and create a free account. Once logged in, look for the green "New" button next to "Top repositories" on the left sidebar, or click the "+" icon in the top navigation. Either gets you to the same place.
The green "New" button on the GitHub dashboard. Hard to miss once you know where to look.
Fill in a name, set it to Private, and turn on "Add README" so the repository is not completely empty. Click "Create repository" at the bottom when you are done.
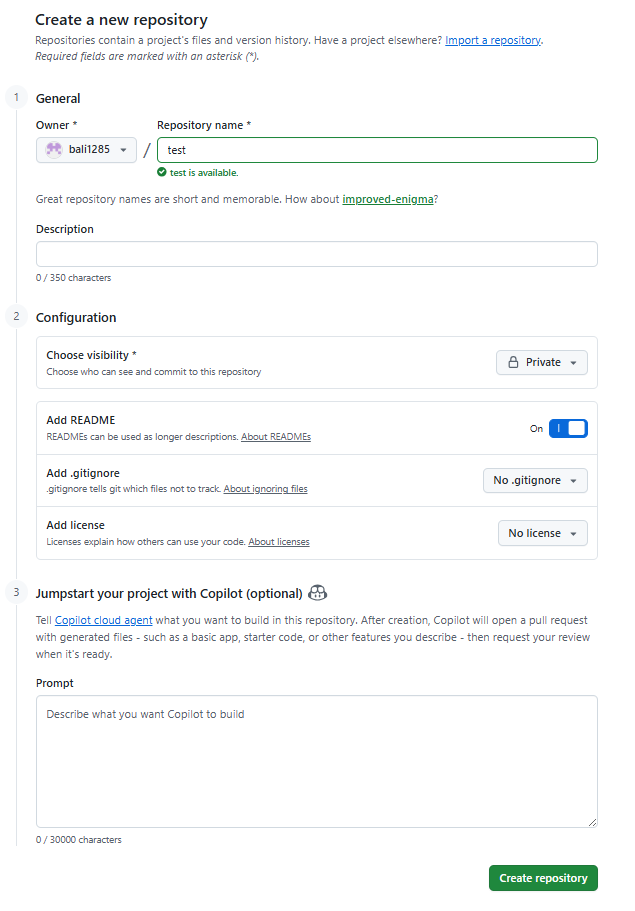
Fill in a name for the repository (something like my-recruitment-site), choose whether it should be public or private, tick "Add a README file" so the repository is not completely empty, and click "Create repository."
Uploading the code
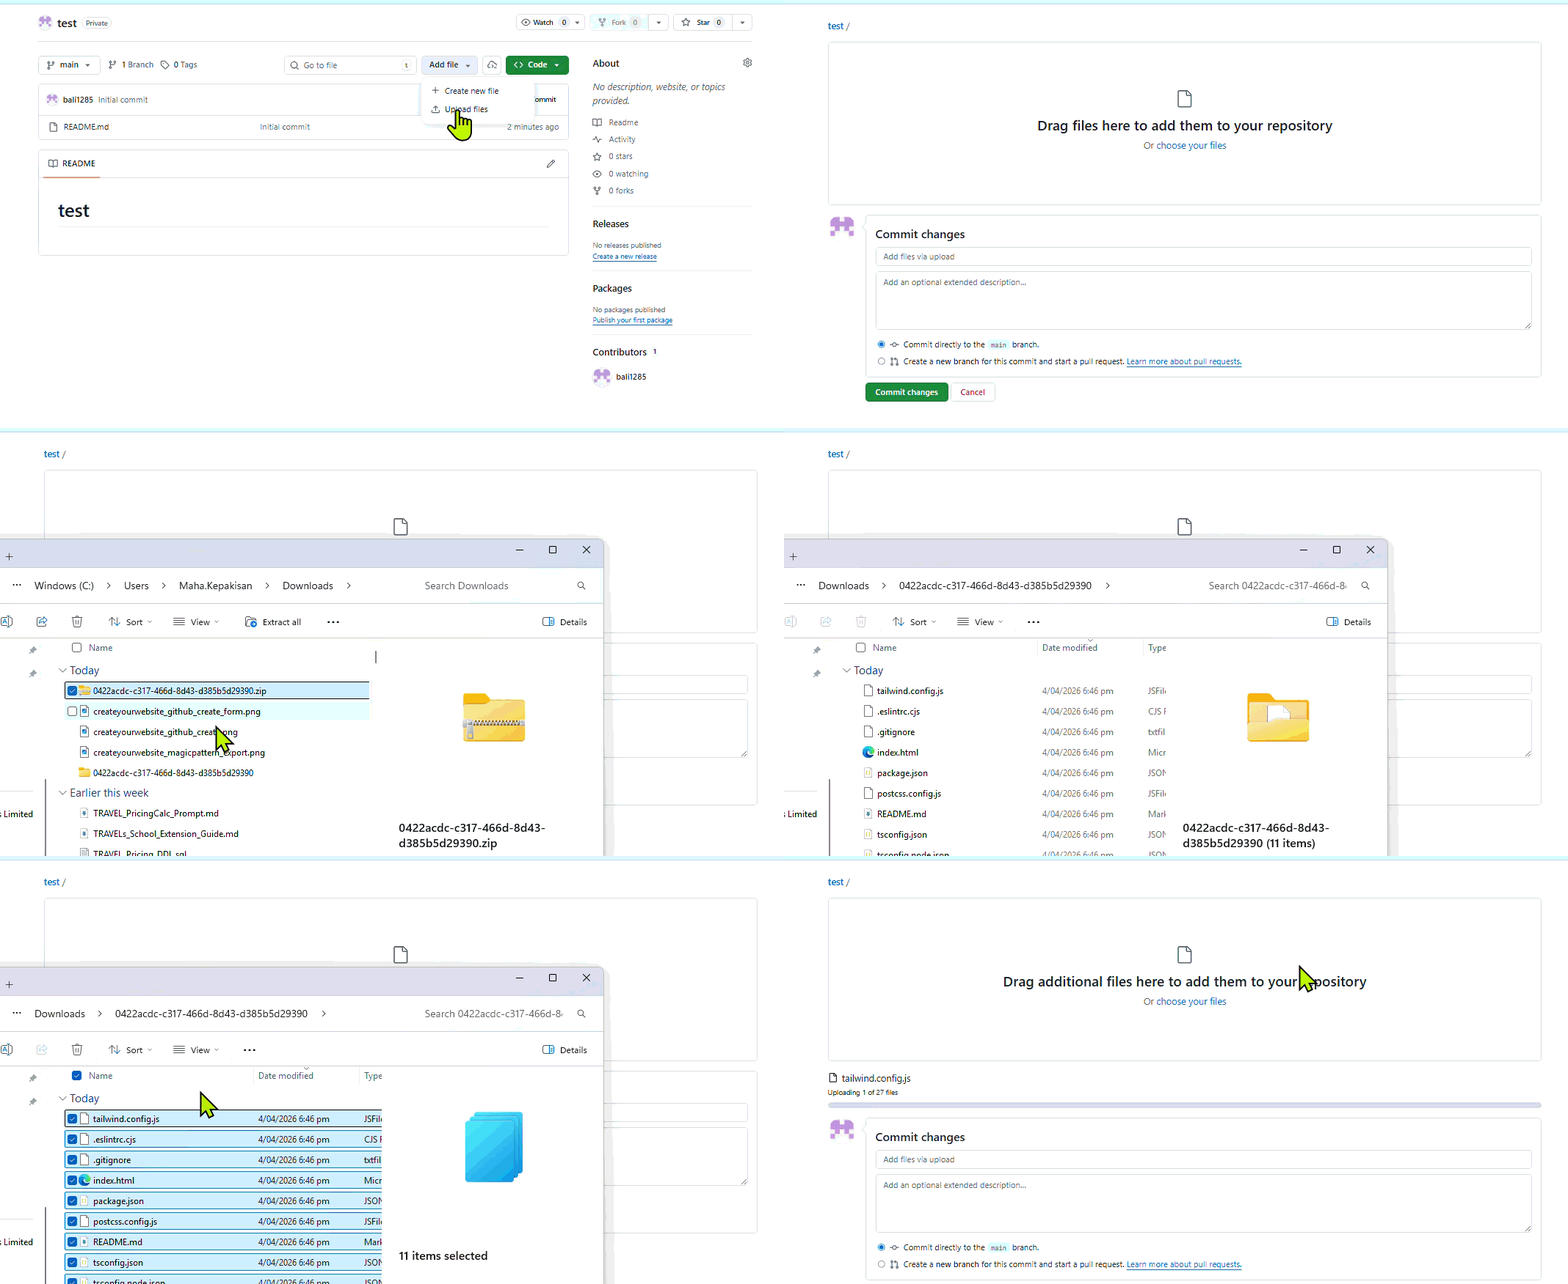
Once the repository is created, GitHub shows you the empty repository page. Click "Add file" then "Upload files." Drag and drop the entire exported project folder from step 1. Once uploaded, click "Commit changes." Your code is now in GitHub and every future change will be tracked here.
Click "Add file" then "Upload files." Drag your exported project folder in, scroll down, and click "Commit changes." That is your codebase in GitHub.
Forking: your ownership escape hatch
If someone else sets up the repository for you, it will initially live under their GitHub account. They will need to add you as a co-owner or contributor so you have access. But at any point, you can fork the repository. Forking creates an identical copy of everything under your own account, including the full commit history. No one can lock you out of it. No one can hold it over your head. The moment you fork it, it is entirely yours and the original owner becomes completely irrelevant to it.
Imagine someone built a Lego house and it is sitting on their desk. You walk over with a magic photocopier, press a button, and now you have an identical Lego house on your own desk. Every single brick, in the exact same place. The original stays where it is. Yours is completely independent. You can repaint it, add a second floor, knock it down and start over. The person who built the original cannot touch yours, take it back, or even see what you changed. That is a fork.
Forking takes about thirty seconds: go to the repository page, click the "Fork" button in the top right, and choose your own account as the destination. You now have a full independent copy in your GitHub account. You can point Azure at your fork and the whole operation runs without you needing anyone else.
The Fork dropdown is in the top right of any repository page. Click it, choose "Create a new fork," and select your own account as the destination. Done in under a minute.

Hosting: Azure Static Web Apps (Free, Permanently)
Azure Static Web Apps is where the site goes live. The free tier is genuinely and permanently free for a static website: a business landing page, a portfolio, a recruitment site. Not a thirty-day trial. Not "free up to 1000 visitors." Just free.
I came to SWA as an application developer, not a website developer. What hooked me was not just the free hosting. It was two things in particular: the native GitHub CI/CD integration, and the built-in identity and authentication support.
The GitHub CI/CD means every time a change is pushed to your GitHub repository, Azure detects it, rebuilds the site, and deploys within a couple of minutes. No manual upload. No FTP. No "did I remember to publish?" anxiety. It just runs.
The identity support means you can gate access to parts of your site behind a login without building any authentication infrastructure yourself. Even on the free tier, you get support for public identity providers like Google, Facebook, and Microsoft accounts. On the Standard tier you can bring your own Microsoft tenant and restrict access to specific users by role. For the kinds of internal tools I originally built this for, that is genuinely powerful and I have written about it in my DuckDB static web app post. For a public website like Peter's recruitment site, we are using none of this: the whole thing is public with no login required.
Azure needs a payment method, but you will not be charged. Even on the free plan, Azure requires you to have a subscription with a payment method attached. Do not close the tab. A pay-as-you-go subscription costs absolutely nothing as long as you only use free-tier resources, which is exactly what we are doing here. Think of it like giving your credit card details at a hotel for incidentals, they are not charging you, they just want to know the card exists. To be extra safe, also set up a budget alert: in Azure, search for "Cost Management," create a budget of $10 a month, and turn on an alert at 80%. If you accidentally spin up a resource that actually costs money, Azure emails you before it becomes a problem. This takes two minutes and has saved me from embarrassing surprises more than once.
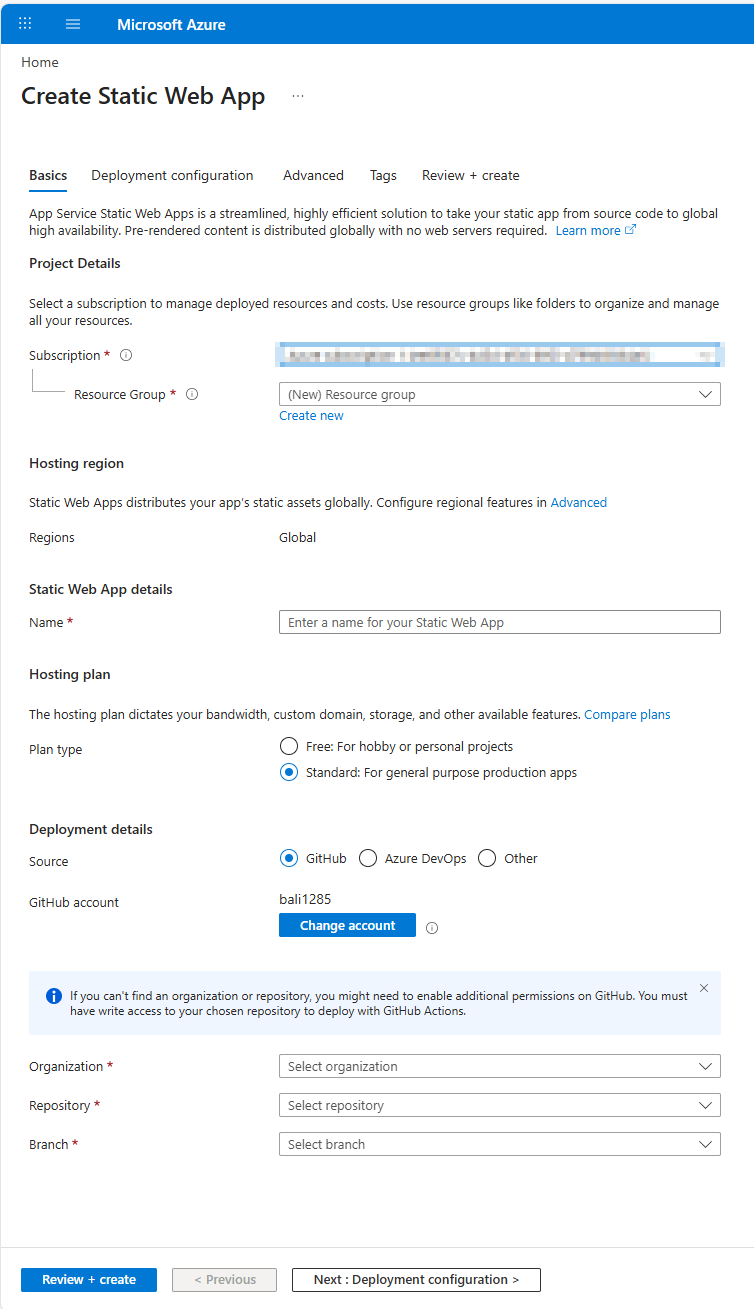
Creating an Azure Static Web App and linking it to GitHub
The Basics tab. Subscription, resource group, a name for your app, Free plan, GitHub as the source, then select your repository and branch. That is all you need on this screen.
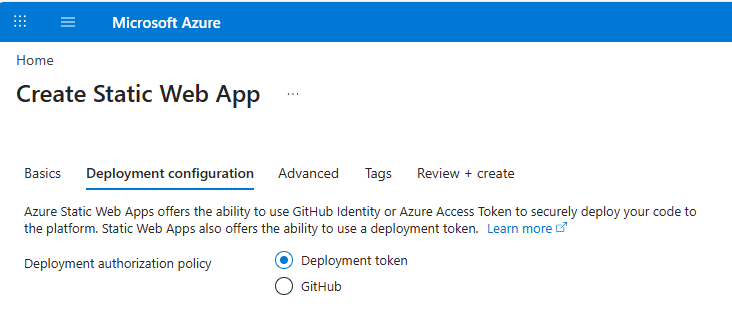
Deployment configuration. This is what gives Azure permission to watch your repository and deploy automatically on every push.
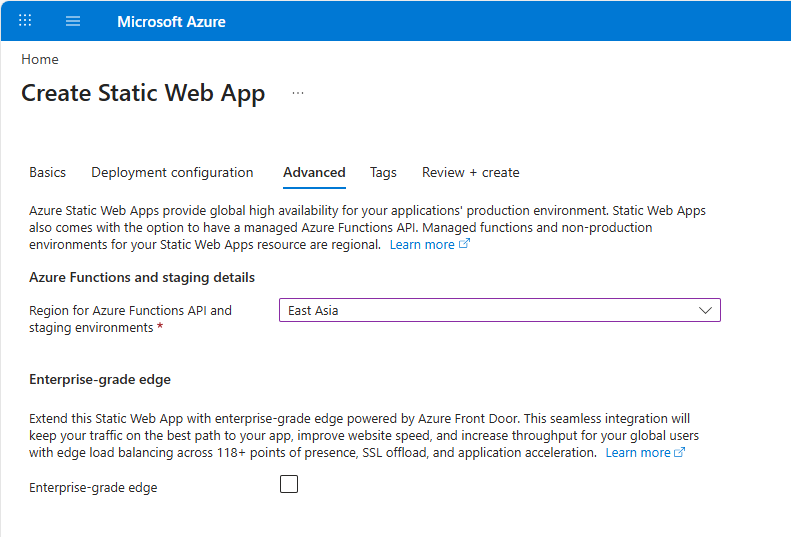
The Advanced tab. Set the region to wherever is closest to your users (East Asia works well for New Zealand). Leave Enterprise-grade edge unticked. Click through to Review + create.
As soon as this is done, you will notice a new folder in your repository called .github/workflows containing a YAML file. If you open that file, you will see a value called azure_static_web_apps_api_token. This is the secret handshake between Azure and GitHub. It is how they prove to each other that they are allowed to work together. Azure generated it, stored it as a secret in your GitHub repository, and the workflow file references it every time it deploys. You do not need to touch it. Just know it is there and what it does.
Imagine you have a robot assistant sitting inside your GitHub repository, watching the front door. Every time you drop off new code (a push), the robot wakes up, picks up the code, builds it into a website, and carries it over to Azure to put it live. You never have to tell the robot to do this. It just does it, every single time, automatically. That robot is a GitHub Action. The YAML file in .github/workflows is the instruction sheet that tells the robot exactly what to do and in what order.
What about build settings? Azure's wizard does not ask you to configure the build output path directly. MagicPattern exports React code, which needs to be compiled before deployment. The output folder is called dist and Azure needs to know to look there. This is handled via a config file called swa-cli.config.json in the root of your repository. If you are using a different AI design tool and are not sure what framework it exported, just open Kiro and ask: "What framework is this project using and how should I configure swa-cli.config.json for Azure SWA?" It will figure it out from the files. For reference, the config looks like this:
{
  "$schema": "https://aka.ms/azure/static-web-apps-cli/schema",
  "configurations": {
    "default": {
      "appLocation": ".",
      "apiLocation": "api",
      "outputLocation": "dist"
    }
  }
}
For Peter: Initially I am setting this up under my Azure account to get you live quickly. When you want to move it to your own account, the steps above are exactly what you do. You point the new SWA at your GitHub repository (or your fork of it), and the site runs independently. The domain, the code, and the DNS stay exactly where they are. Nothing breaks.
Bonus cheapskate option 🤌: the default Azure URL that gets generated, something like purple-field-0678f2900.6.azurestaticapps.net, is already live and fully functional the moment you deploy. So technically you could just... use that. Slap it on a business card. Watch people try to type it. It is free, it is real, and it is considerably more professional than "the website is coming soon I promise." Is it a vibe? Absolutely not. Does it work? One hundred percent. Custom domain is nice to have, not a hard requirement.
Why Azure over Netlify or Vercel? Familiarity. I work in Azure daily, so I know the tooling. Netlify and Vercel have comparable free tiers, the same GitHub CI/CD integration, and either would work perfectly well here. If you are starting fresh with no preference, any of the three is a valid choice. I use Azure because I know it, and knowing your tools is worth more than spending a week optimising for the theoretically best option.
Domain and DNS: Cloudflare
A domain is the address people type to reach your site. Without one, you are sharing a URL like something-delightful-0678f2900.6.azurestaticapps.net. Which, as I noted above, is perfectly fine if budget is the priority and you have a good sense of humour about it. But if you want something that looks like a business, you need a proper domain.
My recommendation: buy your domain through Cloudflare Registrar and use Cloudflare for DNS. The reason is simple: everything in one place. You need Cloudflare for DNS anyway because of CNAME flattening (more on that below), so why buy the domain somewhere else and then point it at Cloudflare after? Fewer accounts, fewer logins, fewer things to go wrong. It just keeps it tidy.
The specific reason I am emphatic about Cloudflare comes down to CNAME flattening. Azure SWA gives you a hostname, not an IP address. Standard DNS does not allow you to point a root domain at a hostname. Cloudflare works around this automatically. Most other registrars do not.
When you type yourbusiness.co.nz into a browser, the internet needs to find the actual server to send you to. Normally that means looking up a specific number called an IP address. Azure SWA does not give you a fixed number. It gives you a name, something like something-delightful.azurestaticapps.net. The rules say you cannot point a root domain at a name instead of a number. Cloudflare quietly solves this by converting the name to a number behind the scenes before anyone checks. Rules technically satisfied. Your site works. GoDaddy does not do this step. That is the whole story.
If you are starting fresh: buy through Cloudflare
Go to cloudflare.com/products/registrar, search for your domain, and buy it there. Your DNS is already in Cloudflare from day one. Skip the next section and go straight to connecting the domain to Azure.
If your domain is already on GoDaddy: the nameserver switch
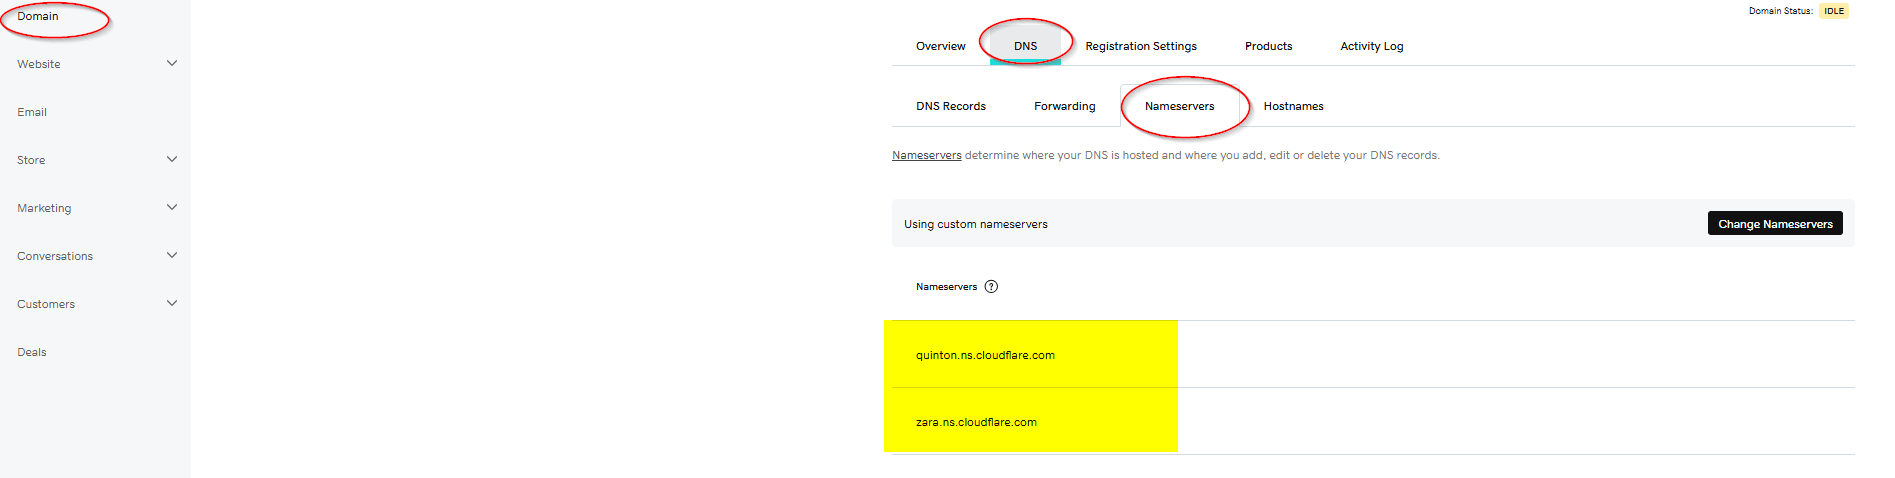
You do not need to transfer the domain away from GoDaddy. You just need to tell GoDaddy to use Cloudflare's DNS instead of its own. The domain stays registered with GoDaddy. Cloudflare just answers the DNS questions. This is exactly what I did for kepakisan.co.nz, and it is documented in full in my post on the DNS journey. The short version:
ada.ns.cloudflare.com).GoDaddy domain settings: DNS tab, then Nameservers sub-tab. Switch to custom nameservers and paste in the two Cloudflare addresses. That single change hands DNS control to Cloudflare.
Connecting your domain to Azure SWA
@ record) pointing at your Azure SWA hostname. Again, grey cloud only.Grey cloud, not orange cloud. In Cloudflare DNS, every record has a proxy toggle. For Azure SWA, both CNAME records must be set to "DNS only" (grey cloud). Leaving them proxied means Cloudflare intercepts all traffic including TLS, Azure never completes the certificate challenge, and you get an SSL error on your site instead of a padlock. If the cert is not provisioning, this is almost always why.
Cloudflare DNS panel with both CNAME records showing the grey cloud "DNS only" status. If you see an orange cloud on either of these, click Edit and turn the proxy off.

Microsoft's official documentation for setting up a custom domain on Azure Static Web Apps is here: learn.microsoft.com, Set up a custom domain. Worth bookmarking for when we get to this step.
On ownership when migrating later: if someone else initially hosted the SWA for you and you want to move it to your own Azure account, you just create a new SWA and add the custom domain there. Cloudflare is where the actual routing happens, so the moment you update your CNAME to point at the new SWA's hostname, traffic switches over. You can then ask the original owner to remove the custom domain binding from their SWA as cleanup. Because you own the Cloudflare account, you control that switch entirely without needing anything from anyone else. The domain follows the DNS, not the Azure resource.
Ongoing Changes: Kiro
The site is live. The domain is connected. Every push to GitHub deploys automatically. Now: what happens when something needs to change?
This is where Kiro comes in. Kiro is an agentic AI development environment built by AWS. You open it, load your project, describe what you want changed, and Kiro makes the change in the code. You review it, push it to GitHub, and the live site updates within minutes. Cursor is a solid alternative if you prefer it.
Getting the code onto your local machine
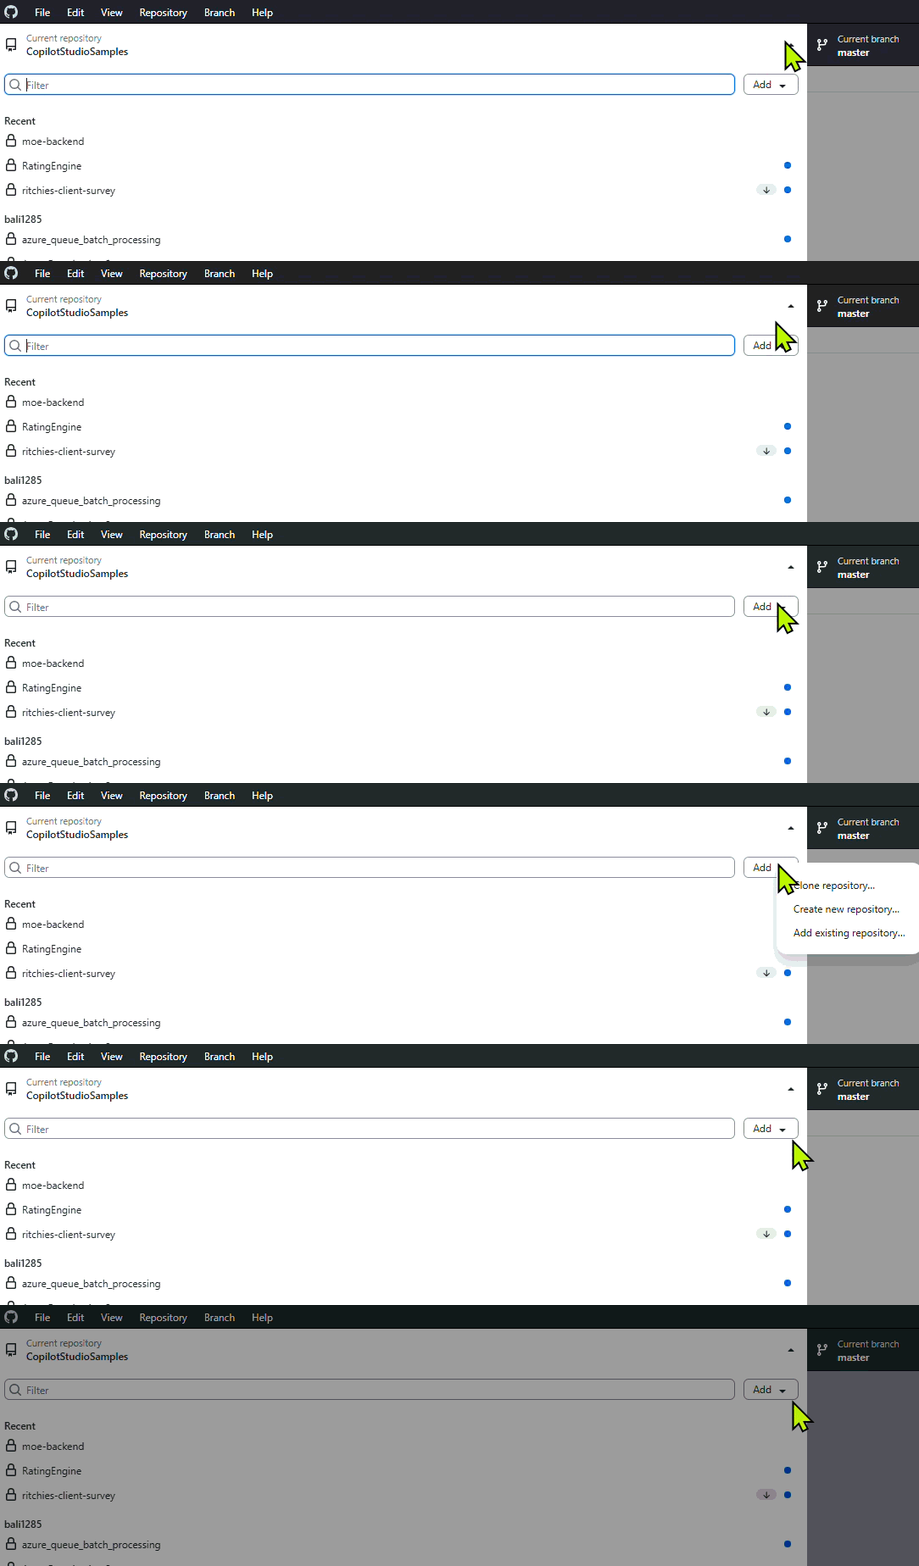
Kiro works with files on your computer, not directly in GitHub. So before using Kiro for the first time, you need to pull the code from GitHub to your local machine. The easiest way to do this without touching a terminal is GitHub Desktop.
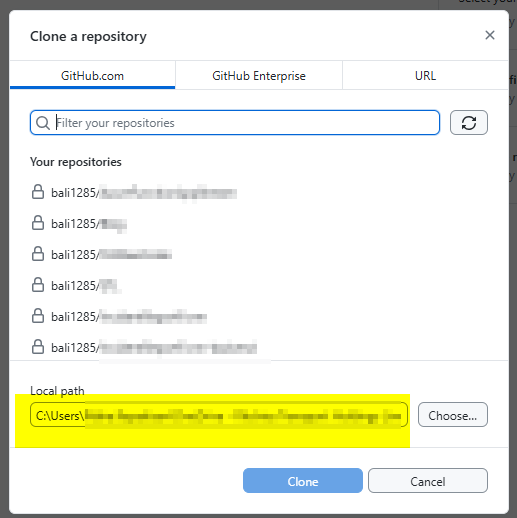
GitHub Desktop clone flow. Sign in, find your repository in the list, choose where on your computer to save it, and click Clone.
The local path field (highlighted) is where the code will live on your machine. You can choose any folder. Once you click Clone, all the files download there.
Making a change with Kiro
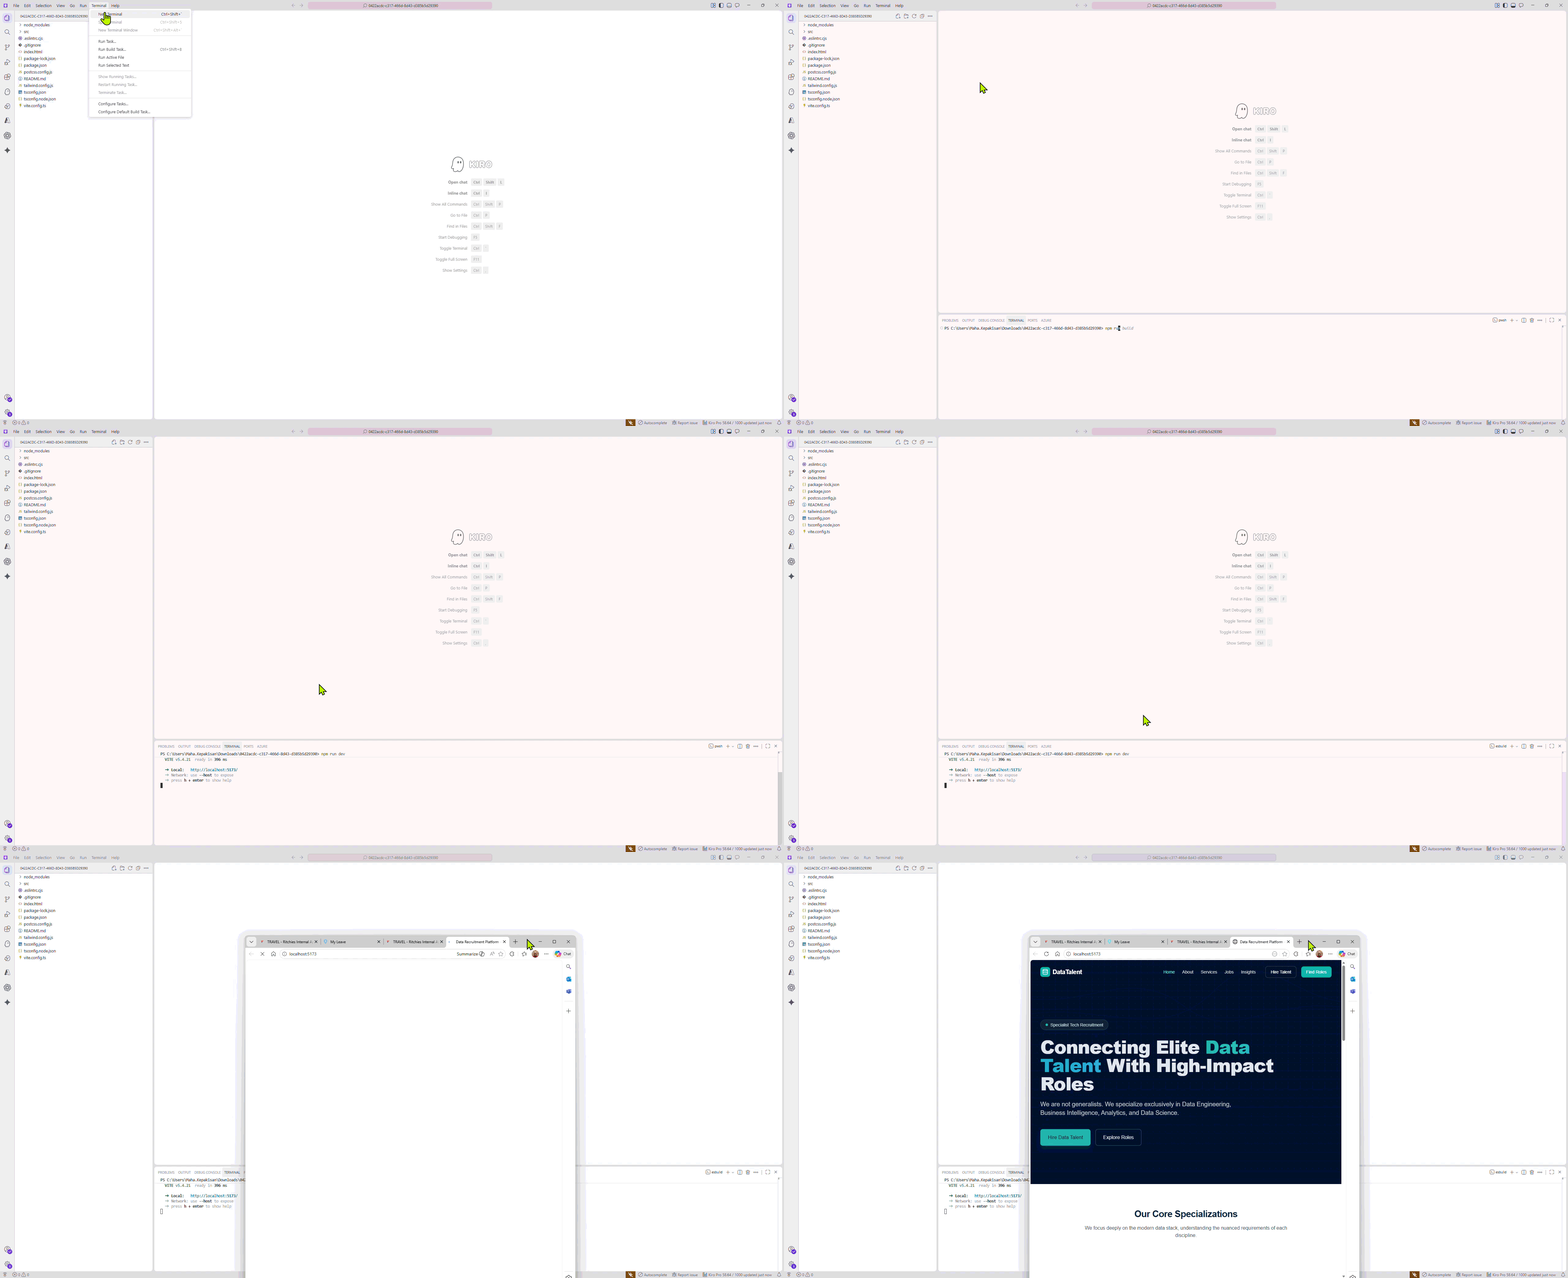
First time only: run npm install before you do anything else in Kiro. MagicPattern exports a React project that includes a package.json file, think of this as a shopping list of all the software packages your site needs to run. The actual packages are not included in the export zip because they are too large. So the very first time you open the project in Kiro, you need to download them. Open a terminal in Kiro (Terminal menu at the top, then "New Terminal"), type npm install, and press Enter. Kiro will download everything and store it in a node_modules folder. This takes a minute or two and only needs to happen once per machine. Skip this and npm run dev will error, which is confusing if you do not know why.
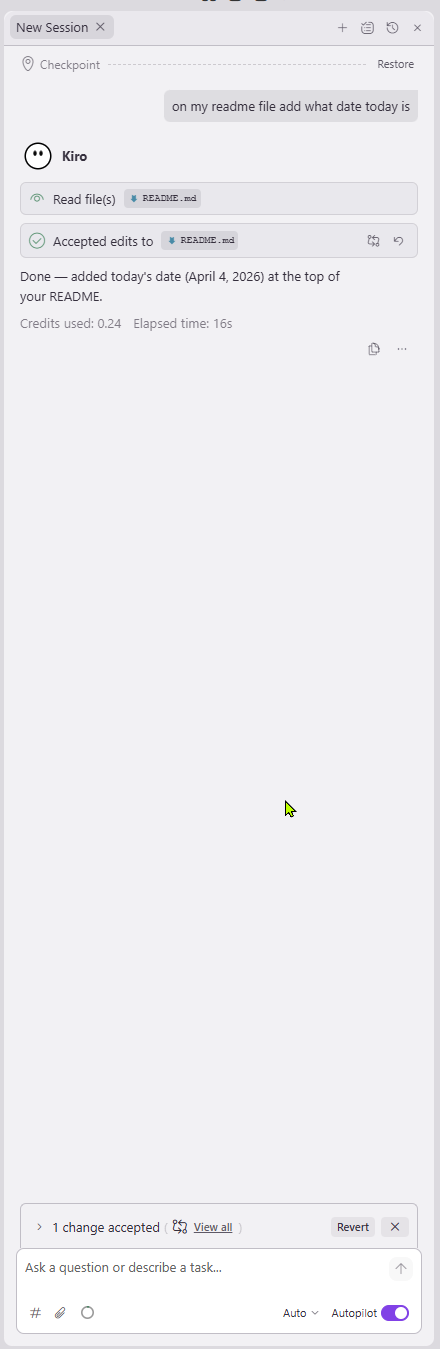
The Kiro chat panel. Type your request, Kiro reads the relevant files and makes the change. You can see exactly which files it touched and revert any edit if needed.
npm run dev, and press Enter. Open localhost:5173 (or whatever port it tells you) in your browser. You will see your full site exactly as it will appear online, with your changes in place.Opening the terminal in Kiro, running npm run dev, and previewing the site in the browser at localhost before pushing anything live.
The diff view shows exactly what changed: removed lines in red, added lines in green. This is what Kiro edits before you commit. You can review every change before it goes anywhere near GitHub.

Where to store your content: two approaches
For a site where content changes regularly, like job listings on a recruitment site, you have two options. Both work. But they suit different situations.
Option A: Content in the code. The text lives directly in the code files. When you need to add a new listing, you describe the change to Kiro, it edits the file, you preview it locally, and push. Technically this works. But it is not the best approach if your content changes frequently. Two reasons: first, the friction. Every content update goes through a full code-change-commit-deploy cycle when ideally you could just update a spreadsheet. Second, you cannot control what is cached in a client's browser. Even when a new version deploys, a user who visited the site before might still see an older cached version until their browser decides to fetch fresh content. You have no ability to force that refresh on their end. For occasional updates, Option A is fine. For something like a recruitment site where roles change constantly, it becomes a pain quickly.
Option B: Google Sheets as a lightweight backend. The site reads its content from a Google Sheet that you control. Add a new role to the spreadsheet and the site reflects it without touching any code. This approach makes the most sense when your data is public-facing and non-sensitive anyway. Job listings on a recruitment site are a perfect example: you want the world to see them, there is nothing private about them, and a Google Sheet is free, easy to update, and easy to hand to anyone else. I am not recommending this as a general-purpose database solution. I am saying that for a list of public records that change frequently, a spreadsheet is the right level of tool for the job. No overengineering required.
Everything Is Yours. That Is the Whole Point.
One thing that bothers me about how web development typically works for small businesses is the dependency it creates. Developer hosts on their account, registers the domain through their agency, and the client ends up in a situation where moving on means starting from scratch. That is a bad deal, and it is entirely avoidable.
This stack is built so that every asset belongs to the person who owns the website. And for a site like this, where there is no complex transactional database, no high availability requirement, no enterprise infrastructure to justify, this approach makes complete sense. Why spend thousands on a web agency when you can own the whole thing outright for a fraction of the cost?
| Asset | Where it lives | Who owns it |
|---|---|---|
| Domain name | GoDaddy (Cloudflare managing DNS) | ✓ You. Your account, your card, your renewal. |
| Codebase | GitHub | ✓ You. Co-owner of the repository. Fork it, export it, hand it to anyone. |
| Hosting (initially) | Azure SWA (your Azure account) | ✓ You. Your Azure subscription, your resource group. |
| DNS configuration | Cloudflare | ✓ You. Your Cloudflare account. |
| CI/CD pipeline | GitHub Actions (auto-configured by Azure) | ✓ Embedded in your repository. It moves wherever the code moves. |
| Design source | MagicPattern | ✓ You drove the design. The exported code is in your GitHub repository. |
If you decide tomorrow that you want someone else to maintain this, you just give them access to the GitHub repository. That is it. They make changes, commit to GitHub, and the CI/CD pipeline deploys automatically. The site keeps running. The domain keeps pointing where it should. No keys to hand over, no platforms to migrate, no awkward "can you transfer the hosting to me" conversations. That is how it should work.
One thing that does require more work: contact forms and applications. A simple "Contact Me" or "Apply for this role" button that sends data somewhere is not just a design change. It requires understanding where that data goes, how it gets stored, what the security implications are, and what the cheapest appropriate option is for the volume you expect. These are all solvable problems and there are some excellent free and near-free options depending on your needs. But it is a separate conversation. If you want to add that kind of functionality, come and chat. We can work out what makes sense before anyone writes a line of code.
The Developer Is No Longer on the Keyboard.
I want to end with something that looks like a provocation but is really just what I have been watching happen.
AI tools like Lovable and Kiro are compressing the time between "I want a website" and "I have one" in a way that would have seemed implausible a few years ago. A non-developer can produce a working, deployable UI in a few hours of prompting. The "build" part of the job, the part that used to justify the invoice, is becoming cheaper and faster at a pace that is not slowing down.
Which creates a real question: if the code is handled by AI, if the deployment is automated, if the design is driven by a prompt, what is the actual value a developer brings?
The value was never the build. It is knowing which tools fit which problem. Why Google Sheets is the right backend here instead of a full database. Why Cloudflare instead of GoDaddy. Why a static site instead of a server. Why SWA instead of a VPS. That is the judgement that matters.
The developer role is reshaping. Less time on the keyboard, more time as the architect who understands the system before touching it. More time as the product owner who knows what not to build. More time as the account manager who can explain to a non-technical client exactly what they are getting and why they own every piece of it. More time as the consultant who translates between what someone needs and what the technology can deliver, efficiently and cost-effectively.
None of that knowledge is in a tutorial. Knowing to use Cloudflare instead of GoDaddy, knowing that a Google Sheet is the right backend for public-facing data when the alternative is weeks of unnecessary complexity, knowing how to structure ownership so the client is never dependent on you: you get this from building things, breaking them, and paying attention to why. That is what AI amplifies rather than replaces.
The most interesting people in any organisation right now are not the ones worried about AI. They are the ones who have figured out how to use it to close the gap between knowing what should be built and actually shipping it.
The threat is not the AI on its own. It is the person next to you who has already worked that out.

Maha Kepakisan, CPA
Former accountant turned data engineering leader with 15+ years across finance, telecom, insurance, and transport. Holds multiple Microsoft certifications including PL-600 Solution Architect Expert. Originally from Bali, Indonesia, now based in Auckland, New Zealand. Writing honestly about data, technology, and what it takes to build things that actually work.